Showing posts with label DIY. Show all posts

Tuesday, March 12, 2013

phDesign: DIY wall art


Art is expensive. So is wallpaper. These are two elements of a home that truly add character and personality so skipping them all together is not an option. My husband and I do not currently own any pieces of original art. We have plenty of sentimental photos and memorabilia in frames but we haven't found any artwork that we love enough to invest in, so our walls are rather bare. 

Recently we decided that we each needed our own office space. Since I work predominately from home and my husband does not, I got to take over the main den area and he has a spot in our second floor loft. He took my antique walnut desk and I got to choose a few new pieces for my room. I will give you an office tour in a later post (once I've got the place camera ready). I wanted to begin by adding femininity and color to my work space so I tracked down the rep for this fabulous Cole and Sons wallpaper, ordered a very inexpensive sample of the paper (under $20) and turned it into art! It's such an easy way to add pattern, color and a unique touch to a space on a budget. 


{this is how the sample arrived}


{I chose two scenes that I liked best and cut them to fit the frames}


{and hung them just over eye level above my sofa} 

You might remember these custom pillows from this post a while back. I am using them to spruce up a sofa that my husband purchased prior to our engagement and then added my DIY table from this post. We have so many other main rooms to invest in right now that I needed to find a way to create a nice, comfy space that I can enjoy working out of daily without breaking the budget.

Photobucket

Tuesday, March 5, 2013

phDesign: DIY side table


Today I am going to share a quick DIY project that I did a few months ago. When my husband and I first moved in together we were a design mess. On top of the fact that we were going from small condos to a house we also had completely different styles. In an effort to meld our tastes together and save some money I decided to take on a few projects. 

Hailing from a set of three (2 sides, one cocktail) this lovely brown metallic table came fully equipped with plastic feet and large exposed rubber stoppers to hold it's glass top in place. If I'm being honest my first reaction was to donate it but then, once I made a few slight adjustments (stoppers and feet found a new home in the garbage), I realized it had a great shape. All it needed were a few slight modifications: this finish, these pretty knobs and some super glue. 


{make sure you clean the entire piece and sand any uneven areas first}


{spray paint is relatively inexpensive so splurge a little on hardware to give your piece a high-end look}


{it's a messy job. prep and cover your workspace thoroughly, wear gloves and make sure you can reach the piece from all angles without moving or touching it} 


{let the piece sit at least 48 hours before you touch or move it just to be sure the finish and glue are set}


From bachelor-pad boring to lady-office chic! This table now sits in the corner of my den and I absolutely love it. The whole project took two days, a couple of hours and cost less than $75 allowing us to splurge on other more important pieces for our home. Hopefully this post has inspired you to re-imagine something that you already own! 

Photobucket

Monday, January 28, 2013

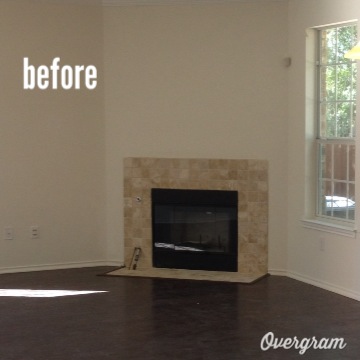
DIY: fireplace surround

In the past few weeks temps have significantly dropped all over the country, including here in Texas. In the spirit of staying warm I thought it was finally appropriate to share this project with you. 

When I found out a wood-burning fireplace came standard with our home I was thrilled. Hailing from the Midwest, both my husband and I have fond memories of chilly evenings and holidays spend around a hearth. The temps might not be sub-zero here in the south but we love the idea of having a fireplace to signify the central gathering place of our home. 

Sounds pretty straight forward, right? There's always a catch.  In our situation it was the surround...or lack there of. Our builder did not include a traditional surround as an option and to have them custom make one was not in our budget. Our solution: build our own. 

I apologize for the lack of photo quality. I only had my iphone at the time these were taken. 


I can distinctly remember being mesmerized by Cinderella's Castle as a little girl. It was a magical place that seemed other-worldly to a five year old. Now, as an adult, I still find myself mesmerized but for different reasons. I'll admit I still think it's a magical place but have you ever stopped to really look at the ornate detail of that building? It's pretty incredible. Not to mention is has withstood decades of abuse love by millions of small children. What makes that possible you ask? The Fypon. 

Fypon Moulded Millwork is constructed of urethane foam. The mixture is kept under pressure in a mould as it expands to any desired shape. The result is a high-density material that is perfect for interior or exterior trim.

If it's good enough for Disney, it's certainly good enough for me. Another major benefit of using this type of material is the fact that it's durable and light. We ordered a door crosshead from this website that arrived promptly on my doorstep in one piece looking like this:  
Underneath the fypon we simply measured and cut pieces of primed moulding and trim from our local Home Depot. 
                                  

The most important thing you can do at this stage is make sure your measurements are accurate. Since we were dealing with a 3 dimensional object that will need to hold weight it was very important that all of the seams matched up tightly. 


Once all of the pieces were attached to the wall we filled any nail holes, sanded rough edges and primed the entire piece. 


We completed the project with two layers of white paint and some caulking to fill in the seams.


Next I will pick a few pieces from my "lust list" to add personality and color to the space. Stay tuned!